3. Connector Configuration
Main settings, Exchange type selection, and Microsoft 365 or Exchange Server configuration.
- Opening and Configuring Exchange Connector
- Configuring Microsoft 365
- Configuring Exchange Server
- Choosing What to Synchronize
- Changing Exchange Type or Connection Method
Opening and Configuring Exchange Connector
Global configuration is available under Settings > Exchange Connector.
From this page, the administrator selects the Exchange type and chooses which data should be synchronized.
Connectivity requirements
With Exchange Server/EWS, it is enough for the vtenext server to reach Exchange: vtenext opens and maintains the streaming connection, so the CRM does not need to be publicly reachable from the Internet. With Microsoft 365/Graph, the vtenext endpoint must be reachable by Microsoft servers in order to receive push notifications.
If Microsoft 365/Graph is used and vtenext cannot be published or reached from the Internet, standard inbound notifications cannot work correctly. A cron-based synchronization can be set up manually, but it is a custom configuration, is not available as a self-service option and is strongly discouraged compared with the standard push-notification architecture.
License activation
If the connector is not yet active, enter the license key and click Verify. Once validated, the full configuration becomes available.
Main settings
- Exchange Version;
- Events synchronization;
- Contacts synchronization;
- Tasks synchronization;
- Organizations synchronization;
- optional deletion of Contacts for inactive users;
- Microsoft 365 connection mode when Office365 is used.
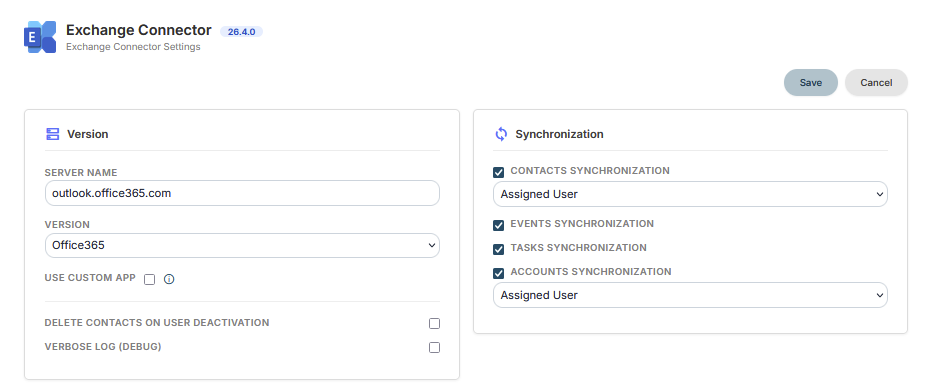
Selecting the Exchange version
- Office365 for Microsoft 365 / Exchange Online;
- Exchange 2016;
- Exchange 2019;
- Exchange SE for Exchange Server Subscription Edition.
The selected version determines the connection method used by the connector.
Before saving
Verify that the Exchange type is correct and enable only the functions that should actually be synchronized. After saving, continue with user configuration.
Configuring Microsoft 365
For Microsoft 365 / Exchange Online, select Office365 as the Exchange version.
If the Mail Server field is empty, the connector normally proposes outlook.office365.com.
Network requirement for Microsoft Graph
With Microsoft 365/Graph, the connector uses push notifications to receive events and changes from Microsoft. The public vtenext endpoint used by the connector must therefore be reachable over the Internet by Microsoft servers. If Microsoft cannot reach the endpoint, standard inbound event handling does not work correctly.
Before going live, verify that the vtenext instance is published correctly over HTTPS and that firewalls, reverse proxies or other security systems do not block Microsoft from reaching the connector endpoint.
A periodic cron-based synchronization can technically be configured manually instead of push notifications. This is strongly discouraged, is not the standard connector architecture and is not available as a self-service configuration: it requires a specific custom setup.
Choosing the connection method
This is the simplest option when the customer does not want to configure and manage a Microsoft application directly in their own tenant. It does not require manually entering Tenant ID, Client ID or Client Secret. Each user still completes their own Microsoft login through Connect.
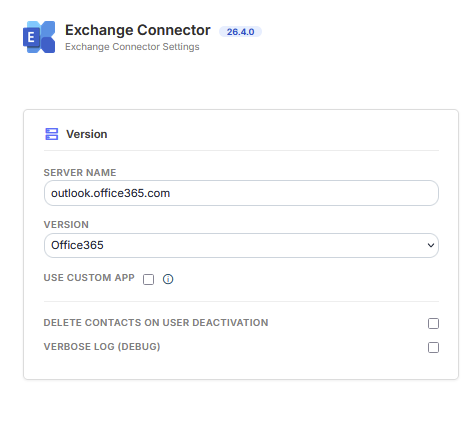
Custom Microsoft App
Use this option when the customer wants to manage the application directly in their Microsoft tenant, for example for specific security, governance or corporate policy requirements.
Enter:
- Tenant ID;
- Client ID;
- Client Secret.
The Microsoft application must use the vtenext redirect URI:
https://YOUR-VTENEXT/modules/Exchange/oAuth2/AuthorizationCode.php
Replace https://YOUR-VTENEXT with the actual CRM address.
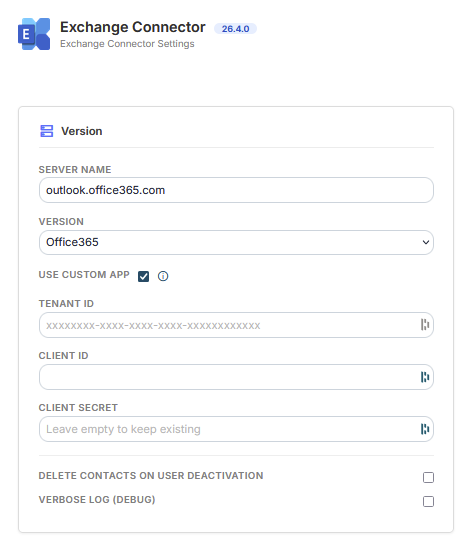
Required permissions
The application must allow users to authorize access to Calendar, Contacts, Tasks / To Do and offline access required to renew the session.
Changing the connection method
After changing the mode, save the configuration, reconnect users with Connect, verify their folders and run a synchronization test.
Plan user reauthorization and validation tests before making the change.
Configuring Exchange Server
If the customer uses an Exchange Server installed on their own infrastructure, select the correct version:
- Exchange 2016;
- Exchange 2019;
- Exchange SE for Exchange Server Subscription Edition.
Network requirements with EWS
With Exchange Server/EWS, the connector uses event streaming: vtenext opens the connection to Exchange and keeps it active to receive updates. The CRM can therefore remain unavailable from the public Internet.
The essential requirement is that the vtenext server can reach the Exchange Server and has the required outbound connectivity. No inbound connection from Exchange to a public vtenext endpoint is required.
Mail Server
In the Mail Server field, enter the Exchange server used by the company. The address must be reachable from the vtenext server.
User credentials
With Exchange Server, each user normally uses their own Exchange credentials. These are configured in the user profile, not in the global connector settings.
Folders
After valid credentials have been entered, the user selects the folders used for Calendar, Tasks and Contacts. The connector can display both default folders and custom mailbox folders.
Resource and Impersonation
If resource mailboxes or impersonation are used, enable these options only when the Exchange environment has already been configured for that access model. Enabling a flag in vtenext does not grant permissions on Exchange.
Recommended check
- Test username and password.
- Select the required folders.
- Save the user.
- Test an event in both directions.
- Test Contacts and Tasks if enabled.
Choosing What to Synchronize
In the connector configuration, the main synchronization functions can be enabled or disabled independently.
Events / Calendar
Enable this option when appointments and events must remain aligned between vtenext and Exchange. Also test recurring events and, with Microsoft 365, online meetings if used.
Contacts
Enable Contact synchronization when contacts should also be available in Exchange. The field mapping determines which values are transferred, such as e-mail, phone and address.
Tasks
Enable this option when tasks must be synchronized with Microsoft / Exchange tasks. With Microsoft 365, the task folder corresponds to a Microsoft To Do list selected by the user.
Organizations
Organization synchronization transfers company data according to the configured mapping.
Specific user or “same as entity”
For Contacts and Organizations, synchronization can use either a specific user or same as entity, which follows the record assignee. Selecting a specific user sends all records to a predefined mailbox, which can then be used on the Exchange side for shared lists or shared access scenarios.
Contacts and inactive users
Enable deletion of Contacts for inactive users only if that behavior is explicitly required. In environments with shared Contacts, test it first with one user and a small number of records.
Practical rule
Do not enable a function simply because it is available. Synchronize only the modules that are actually required and review the corresponding mapping first.
Changing Exchange Type or Connection Method
Changing the Exchange type on a connector already in use must be treated as a configuration migration.
Do not change the Exchange type or connection method directly in production without planning the change. Users may need to authenticate again, reselect folders and wait for a new synchronization alignment.
Switching between Exchange Server and Microsoft 365
When changing from Exchange Server to Office365, or vice versa, vtenext displays a confirmation message. After confirmation, the connector resets the connection state required for synchronization.
After saving, users may need to:
- sign in again;
- re-enter or verify credentials;
- select folders again;
- wait for a new connector alignment.
Field mappings and original vtenext records are not deleted simply because the provider changes.
Switching between vtenext Proxy and Custom Microsoft App
- Select the new mode.
- Enter the app parameters if required.
- Save and confirm the warning.
- Open each Exchange user.
- Run Connect again.
- Check the selected folders.
- Run a synchronization test.
When to make the change
Perform the change in a controlled maintenance window and avoid simultaneous bulk imports, mapping changes, mass record updates or large folder moves in Exchange. First complete the provider change and verify that synchronization is stable.