Exchange Connector vtenext
User manual for vtenext administrators and users: migration from 20.04.xx to the new 24.08/26.04 module structure, upgrade from 24.08 to 26.04, Microsoft 365/Exchange configuration, user connection, folder selection, field mapping, daily use and troubleshooting.
- 1. Introduction
- 2. Migration from 20.04.xx to 24.08 or 26.04
- Before Migrating from 20.04.xx
- Migrating from 20.04.xx to 24.08 or 26.04
- Upgrading from 24.08 to 26.04
- Microsoft 365: Temporarily Re-enabling EWS During Migration
- Checks After Migration or Upgrade
- 3. Connector Configuration
- Opening and Configuring Exchange Connector
- Configuring Microsoft 365
- Configuring Exchange Server
- Choosing What to Synchronize
- Changing Exchange Type or Connection Method
- 4. User Configuration
- Connecting a Microsoft 365 User
- Configuring an Exchange Server User
- Selecting or Changing Synchronization Folders
- Resource Users and Impersonation
- 5. Field Mapping
- Viewing Field Mapping
- Editing a Mapping
- What Happens When a Mapping Is Changed
- Recommended Mapping Examples
- 6. Daily Use of the Connector
- 7. Common Issues and Checks
1. Introduction
Purpose of the connector, supported environments and what changes in versions 24.08 and 26.04.
What the Connector Is For
Exchange Connector keeps selected vtenext data synchronized with Microsoft 365 or Microsoft Exchange.
It can synchronize:
- Calendar / Events;
- Tasks;
- Contacts;
- Organizations.
Synchronization can work in both directions: changes made in vtenext can be sent to Exchange and changes made in Exchange can be brought back into vtenext, depending on the enabled features.
Two connection methods
- Microsoft 365 / Exchange Online: uses Microsoft Graph;
- Exchange Server installed on the customer infrastructure: uses EWS.
For end users, the main difference is how the account is connected: Microsoft 365 uses Microsoft sign-in and authorization, while Exchange Server uses Exchange credentials and selected folders.
Who configures what
The vtenext administrator configures the connector, selects what must be synchronized and defines field mappings. Each user then completes their own account connection and selects the folders to use when required.
Once configuration is complete, the connector works automatically in the background.
What Changes from 20.04.xx to Versions 24.08 and 26.04
The most important difference from version 20.04 is not only Microsoft Graph: the way the connector is integrated into vtenext also changes.
From 20.04 to the new structure
In version 20.04, Exchange Connector was installed using the legacy dedicated procedure and was not registered as a standard vtenext vtlib module.
In versions 24.08 and 26.04, the connector is managed as a real vtenext module/extension. After the first migration, future upgrades can therefore be handled through the normal module update procedure.
For this reason, moving from 20.04.xx to 24.08 or 26.04 requires a specific migration and a one-time module registration script.
If Microsoft 365 is used
The new connector generation uses Microsoft Graph for Microsoft 365 / Exchange Online. After migration, the Office365 configuration and user connections must be checked.
The connector can use either vtenext Proxy or a Custom Microsoft App.
If Exchange Server is used
Exchange Server installed on the customer infrastructure continues to use EWS. Supported configurations include Exchange 2016, Exchange 2019 and Exchange Server Subscription Edition.
Future upgrades
Once Exchange Connector is already using the new structure, for example version 24.08, moving to 26.04 no longer requires the registration script.
- 20.04.xx → 24.08 or 26.04 = structural migration;
- 24.08 → 26.04 = standard module upgrade.
2. Migration from 20.04.xx to 24.08 or 26.04
Special migration procedure from the legacy 20.04 structure to the new vtenext module structure, plus the standard upgrade from 24.08 to 26.04.
Before Migrating from 20.04.xx
Migrating from any version in the 20.04.xx family is a special step because Exchange Connector moves from the legacy dedicated installation to the new vtenext module/extension structure.
Migration paths
- 20.04.xx → 24.08;
- 20.04.xx → 26.04.
In both cases, the Exchange module registration step must be performed once. If Exchange Connector is already on version 24.08, use the standard upgrade procedure described in Upgrading from 24.08 to 26.04.
Before you begin
Create a full backup of the vtenext instance and record the current Exchange configuration. Check at least:
- current connector version;
- Exchange type in use;
- enabled synchronization modules;
- users using the connector;
- folders selected by users;
- custom mappings for Contacts and Organizations;
- any existing synchronization errors.
Why the registration script is required
The script registers the existing Exchange Connector as a vtenext vtlib module. It does not reinstall the connector and must be run only once on an instance coming from the 20.04.xx family.
The full operational procedure is described in Migrating from 20.04.xx to 24.08 or 26.04.
If Microsoft 365 is used
The new generation uses Microsoft Graph for Exchange Online. Before migration, decide whether to use the vtenext Proxy or a Custom Microsoft App. Differences, requirements and configuration are described in Configuring Microsoft 365.
If Exchange Server is used
For on-premises Exchange Server, the module structure still has to be migrated, while communication continues to use EWS. See Configuring Exchange Server.
Migrating from 20.04.xx to 24.08 or 26.04
Moving from 20.04.xx to 24.08 or 26.04 requires a special procedure because Exchange Connector must be converted from the legacy installation into a registered vtenext module.
1. Back up the instance
Before starting, create a full backup of the vtenext database and files and record users, selected folders and any custom mappings.
2. Upgrade vtenext to the target generation
Upgrade the vtenext instance to the required target generation and use the Exchange Connector package built for the same vtenext generation.
3. Register Exchange Connector as a vtenext module
On installations coming from 20.04.xx, run the Exchange module registration script once:
register_exchange_module.php
Copy the script to ../plugins/script/ and run it through the browser, for example https://mycrm.example/plugins/script/register_exchange_module.php.
Remove
register_exchange_module.php immediately after execution. The script must be run only once.The script registers the existing connector as a vtenext vtlib module without recreating the existing Exchange tables, cron entries, settings or fields.
Open Module Manager, section Custom, and verify that Exchange Connector is listed.
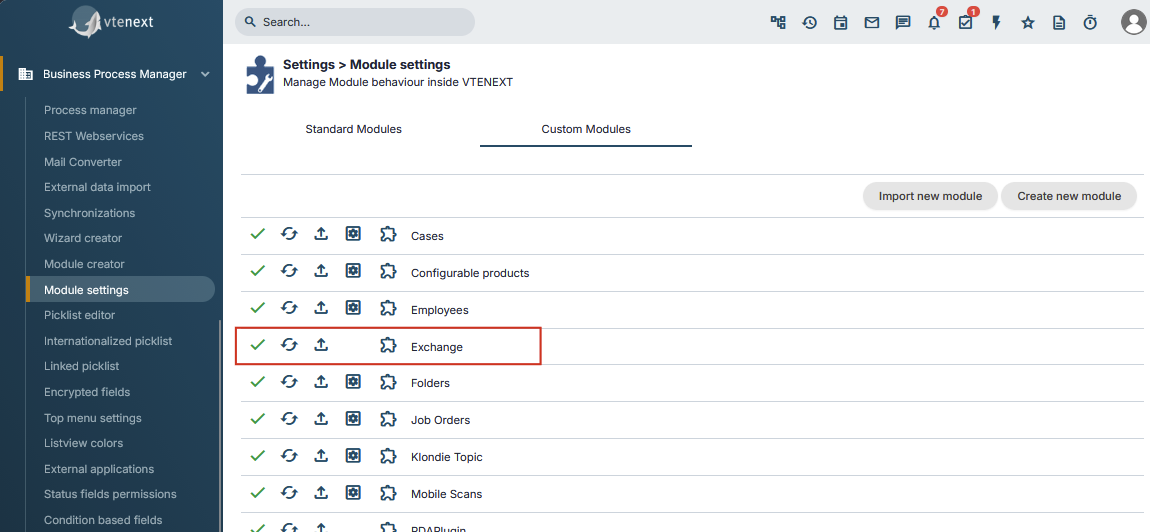
If Exchange Connector appears correctly in Module Manager, module registration has completed successfully.
4. Upgrade the module to the target version
Install or upgrade Exchange Connector using the ZIP package for the target version. From this point onward, the connector is managed as a standard vtenext module.

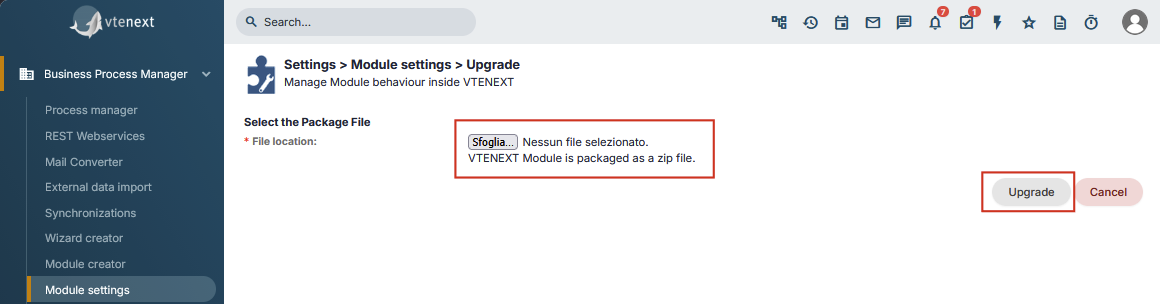
5. If Microsoft 365 is used
- Open Settings > Exchange Connector.
- Verify that the server type is Office365.
- Choose vtenext Proxy or Custom Microsoft App.
- If a custom app is used, enter its configuration again.
- Save.
- Check users and reconnect them with Connect if required.
- Verify selected folders.
- Run a synchronization test.
During migration to the new structure, Office365 is moved to the vtenext Proxy mode. If the customer wants to use a custom Microsoft App, Tenant ID, Client ID and Client Secret must be configured again after migration.
6. If Exchange Server is used
For on-premises Exchange Server, the structural migration is the same, while communication continues to use EWS. Check Exchange version, Mail Server, user credentials, selected folders and synchronization in both directions.
7. Final check
The migration is complete when the module is correctly listed in Module Manager, the expected version is installed, users and folders are correct, and synchronization tests in both directions succeed.
Upgrading from 24.08 to 26.04
If Exchange Connector is already on version 24.08, moving to 26.04 is a standard module upgrade.
The registration script used for migrations from 20.04.xx must not be run again because the connector is already registered as a vtenext module/extension.
Procedure
- Create a backup of the vtenext instance.
- Verify that Exchange Connector 24.08 is working correctly before the upgrade.
- Use the Exchange Connector ZIP package for version 26.04.
- Run the standard module upgrade from vtenext Module Manager.

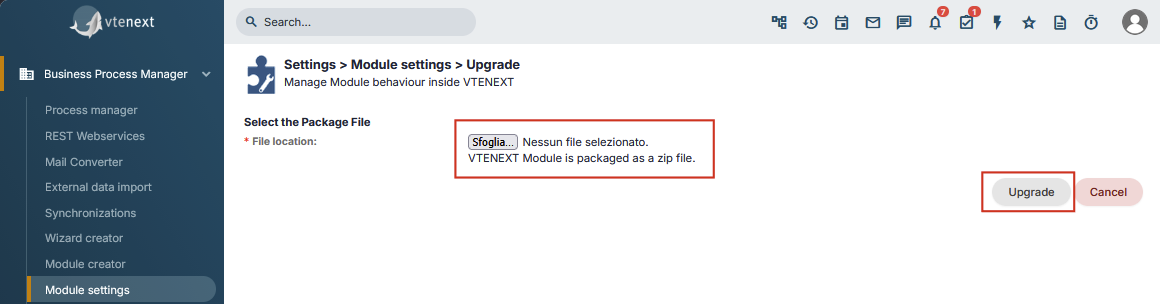
Wait for the upgrade to complete, then open Settings > Exchange Connector and verify the installed version.
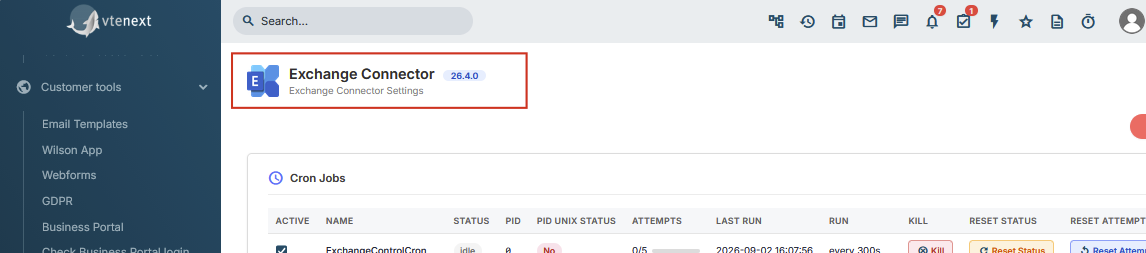
Finally, check configuration, users, selected folders and mappings, and run a synchronization test in both directions.
What not to do
- Do not run
register_exchange_module.phpagain. - Do not treat the connector as a legacy 20.04 installation.
- Do not reinstall the module from scratch.
- Do not delete configuration or users before the upgrade.
The registration script belongs only to the first migration from the 20.04.xx structure to the new module structure.
Microsoft 365: Temporarily Re-enabling EWS During Migration
Microsoft is retiring EWS in Exchange Online / Microsoft 365. This change does not apply to Exchange Server installed on the customer infrastructure.
For this reason, when migrating from 20.04.xx to the new connector generation (24.08 or 26.04), Microsoft 365 must move to Microsoft Graph.
Key dates
Microsoft begins progressively blocking EWS in Exchange Online tenants that have not explicitly configured the available exception.
EWS will be permanently disabled in Exchange Online and can no longer be re-enabled through the temporary administrative setting.
If an EWS integration stops working during migration
During the transition period, Microsoft still allows administrators to temporarily re-enable EWS.
The Microsoft 365 administrator can manage the EWSEnabled setting and, where required, the list of authorized EWS applications.
Re-enabling EWS should only be used to keep the service operational while completing the migration to Microsoft Graph. It is not a permanent solution.
Recommended approach for vtenext
If the legacy 20.04.xx connector stops communicating with Exchange Online after Microsoft blocks EWS:
- evaluate whether EWS should be temporarily re-enabled to avoid an immediate service interruption;
- migrate Exchange Connector from 20.04.xx to 24.08 or 26.04 using the module registration procedure;
- configure Office365 with Microsoft Graph;
- reconnect users if required;
- verify synchronization;
- remove the dependency on EWS once migration is complete.
If Exchange Connector is already on version 24.08, moving to 26.04 is a standard ZIP module upgrade and does not require the structural migration again.
Microsoft reference
Exchange Online EWS: Your Time Is Almost Up
Checks After Migration or Upgrade
After migrating from 20.04.xx or upgrading from 24.08 to 26.04, do not consider the work complete until configuration, users and synchronization have been verified.
Module checks
- Exchange Connector is listed in Module Manager;
- the installed version is the expected one;
- the configured Exchange type is correct;
- the required synchronization features are enabled;
- the license is valid;
- no blocking errors are shown on the Exchange Connector page.
User checks
For each Exchange user, verify connection status, correct account, selected folders, any Resource/Impersonation settings and absence of authentication errors. For Microsoft 365, reconnect the user if access is no longer valid.
Mapping checks
Open Exchange Field Mapping and check Contacts and Organizations, especially if custom mappings were used in 20.04.xx.
Recommended test
- Create a test record in vtenext and verify it reaches Exchange.
- Modify it in Exchange and verify the change returns to vtenext.
- Test a recurring event if used.
- Test a Contact with e-mail and phone.
- Test a Task with status and due date.
- Test an Organization if organization synchronization is enabled.
When the migration can be considered complete
The process is complete when the module is registered and upgradeable, all required users are connected, two-way tests succeed without duplicates, the mapping is correct and no persistent errors remain.
3. Connector Configuration
Main settings, Exchange type selection, and Microsoft 365 or Exchange Server configuration.
Opening and Configuring Exchange Connector
Global configuration is available under Settings > Exchange Connector.
From this page, the administrator selects the Exchange type and chooses which data should be synchronized.
Connectivity requirements
With Exchange Server/EWS, it is enough for the vtenext server to reach Exchange: vtenext opens and maintains the streaming connection, so the CRM does not need to be publicly reachable from the Internet. With Microsoft 365/Graph, the vtenext endpoint must be reachable by Microsoft servers in order to receive push notifications.
If Microsoft 365/Graph is used and vtenext cannot be published or reached from the Internet, standard inbound notifications cannot work correctly. A cron-based synchronization can be set up manually, but it is a custom configuration, is not available as a self-service option and is strongly discouraged compared with the standard push-notification architecture.
License activation
If the connector is not yet active, enter the license key and click Verify. Once validated, the full configuration becomes available.
Main settings
- Exchange Version;
- Events synchronization;
- Contacts synchronization;
- Tasks synchronization;
- Organizations synchronization;
- optional deletion of Contacts for inactive users;
- Microsoft 365 connection mode when Office365 is used.
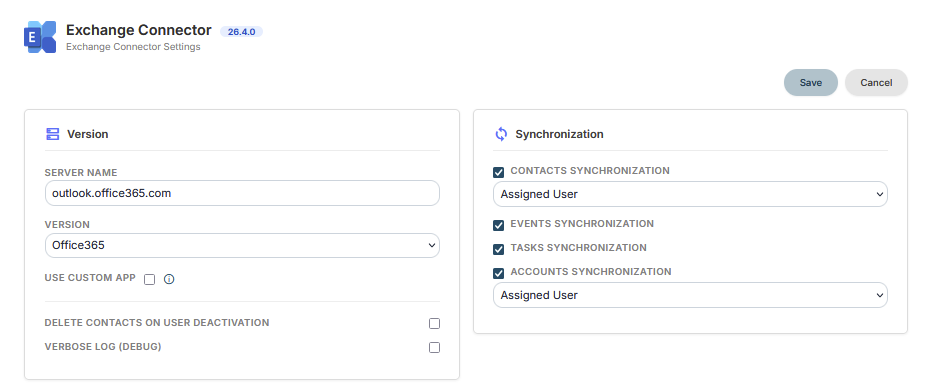
Selecting the Exchange version
- Office365 for Microsoft 365 / Exchange Online;
- Exchange 2016;
- Exchange 2019;
- Exchange SE for Exchange Server Subscription Edition.
The selected version determines the connection method used by the connector.
Before saving
Verify that the Exchange type is correct and enable only the functions that should actually be synchronized. After saving, continue with user configuration.
Configuring Microsoft 365
For Microsoft 365 / Exchange Online, select Office365 as the Exchange version.
If the Mail Server field is empty, the connector normally proposes outlook.office365.com.
Network requirement for Microsoft Graph
With Microsoft 365/Graph, the connector uses push notifications to receive events and changes from Microsoft. The public vtenext endpoint used by the connector must therefore be reachable over the Internet by Microsoft servers. If Microsoft cannot reach the endpoint, standard inbound event handling does not work correctly.
Before going live, verify that the vtenext instance is published correctly over HTTPS and that firewalls, reverse proxies or other security systems do not block Microsoft from reaching the connector endpoint.
A periodic cron-based synchronization can technically be configured manually instead of push notifications. This is strongly discouraged, is not the standard connector architecture and is not available as a self-service configuration: it requires a specific custom setup.
Choosing the connection method
This is the simplest option when the customer does not want to configure and manage a Microsoft application directly in their own tenant. It does not require manually entering Tenant ID, Client ID or Client Secret. Each user still completes their own Microsoft login through Connect.
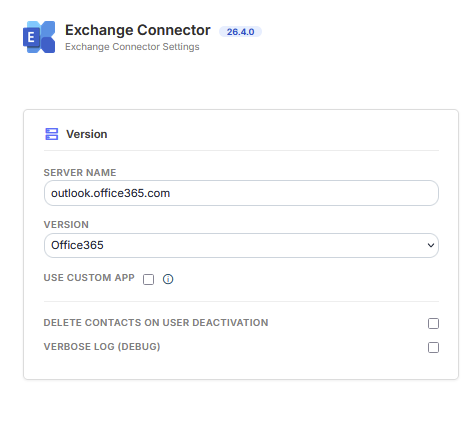
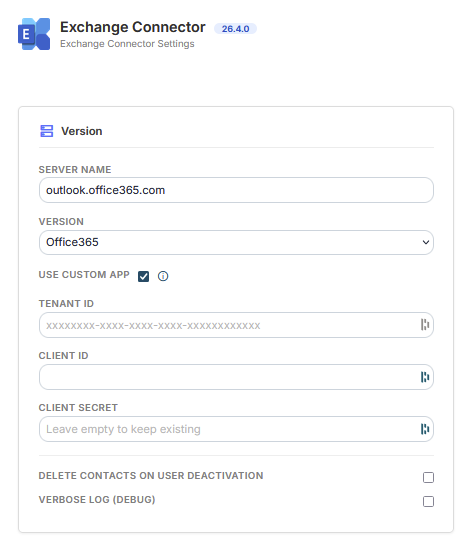
Custom Microsoft App
Use this option when the customer wants to manage the application directly in their Microsoft tenant, for example for specific security, governance or corporate policy requirements.
Enter:
- Tenant ID;
- Client ID;
- Client Secret.
The Microsoft application must use the vtenext redirect URI:
https://YOUR-VTENEXT/modules/Exchange/oAuth2/AuthorizationCode.php
Replace https://YOUR-VTENEXT with the actual CRM address.
Required permissions
The application must allow users to authorize access to Calendar, Contacts, Tasks / To Do and offline access required to renew the session.
Changing the connection method
After changing the mode, save the configuration, reconnect users with Connect, verify their folders and run a synchronization test.
Plan user reauthorization and validation tests before making the change.
Configuring Exchange Server
If the customer uses an Exchange Server installed on their own infrastructure, select the correct version:
- Exchange 2016;
- Exchange 2019;
- Exchange SE for Exchange Server Subscription Edition.
Network requirements with EWS
With Exchange Server/EWS, the connector uses event streaming: vtenext opens the connection to Exchange and keeps it active to receive updates. The CRM can therefore remain unavailable from the public Internet.
The essential requirement is that the vtenext server can reach the Exchange Server and has the required outbound connectivity. No inbound connection from Exchange to a public vtenext endpoint is required.
Mail Server
In the Mail Server field, enter the Exchange server used by the company. The address must be reachable from the vtenext server.
User credentials
With Exchange Server, each user normally uses their own Exchange credentials. These are configured in the user profile, not in the global connector settings.
Folders
After valid credentials have been entered, the user selects the folders used for Calendar, Tasks and Contacts. The connector can display both default folders and custom mailbox folders.
Resource and Impersonation
If resource mailboxes or impersonation are used, enable these options only when the Exchange environment has already been configured for that access model. Enabling a flag in vtenext does not grant permissions on Exchange.
Recommended check
- Test username and password.
- Select the required folders.
- Save the user.
- Test an event in both directions.
- Test Contacts and Tasks if enabled.
Choosing What to Synchronize
In the connector configuration, the main synchronization functions can be enabled or disabled independently.
Events / Calendar
Enable this option when appointments and events must remain aligned between vtenext and Exchange. Also test recurring events and, with Microsoft 365, online meetings if used.
Contacts
Enable Contact synchronization when contacts should also be available in Exchange. The field mapping determines which values are transferred, such as e-mail, phone and address.
Tasks
Enable this option when tasks must be synchronized with Microsoft / Exchange tasks. With Microsoft 365, the task folder corresponds to a Microsoft To Do list selected by the user.
Organizations
Organization synchronization transfers company data according to the configured mapping.
Specific user or “same as entity”
For Contacts and Organizations, synchronization can use either a specific user or same as entity, which follows the record assignee. Selecting a specific user sends all records to a predefined mailbox, which can then be used on the Exchange side for shared lists or shared access scenarios.
Contacts and inactive users
Enable deletion of Contacts for inactive users only if that behavior is explicitly required. In environments with shared Contacts, test it first with one user and a small number of records.
Practical rule
Do not enable a function simply because it is available. Synchronize only the modules that are actually required and review the corresponding mapping first.
Changing Exchange Type or Connection Method
Changing the Exchange type on a connector already in use must be treated as a configuration migration.
Do not change the Exchange type or connection method directly in production without planning the change. Users may need to authenticate again, reselect folders and wait for a new synchronization alignment.
Switching between Exchange Server and Microsoft 365
When changing from Exchange Server to Office365, or vice versa, vtenext displays a confirmation message. After confirmation, the connector resets the connection state required for synchronization.
After saving, users may need to:
- sign in again;
- re-enter or verify credentials;
- select folders again;
- wait for a new connector alignment.
Field mappings and original vtenext records are not deleted simply because the provider changes.
Switching between vtenext Proxy and Custom Microsoft App
- Select the new mode.
- Enter the app parameters if required.
- Save and confirm the warning.
- Open each Exchange user.
- Run Connect again.
- Check the selected folders.
- Run a synchronization test.
When to make the change
Perform the change in a controlled maintenance window and avoid simultaneous bulk imports, mapping changes, mass record updates or large folder moves in Exchange. First complete the provider change and verify that synchronization is stable.
4. User Configuration
User connection, Microsoft 365 authentication, Exchange credentials and folder selection.
Connecting a Microsoft 365 User
With Microsoft 365, each user connects their own account directly from the vtenext user profile.
Procedure
- Open the user profile.
- Locate the Exchange section.
- Click Connect.
- Sign in with the correct Microsoft account.
- Confirm the requested authorization.
- Return to vtenext.
- Select synchronization folders if requested.
- Save.
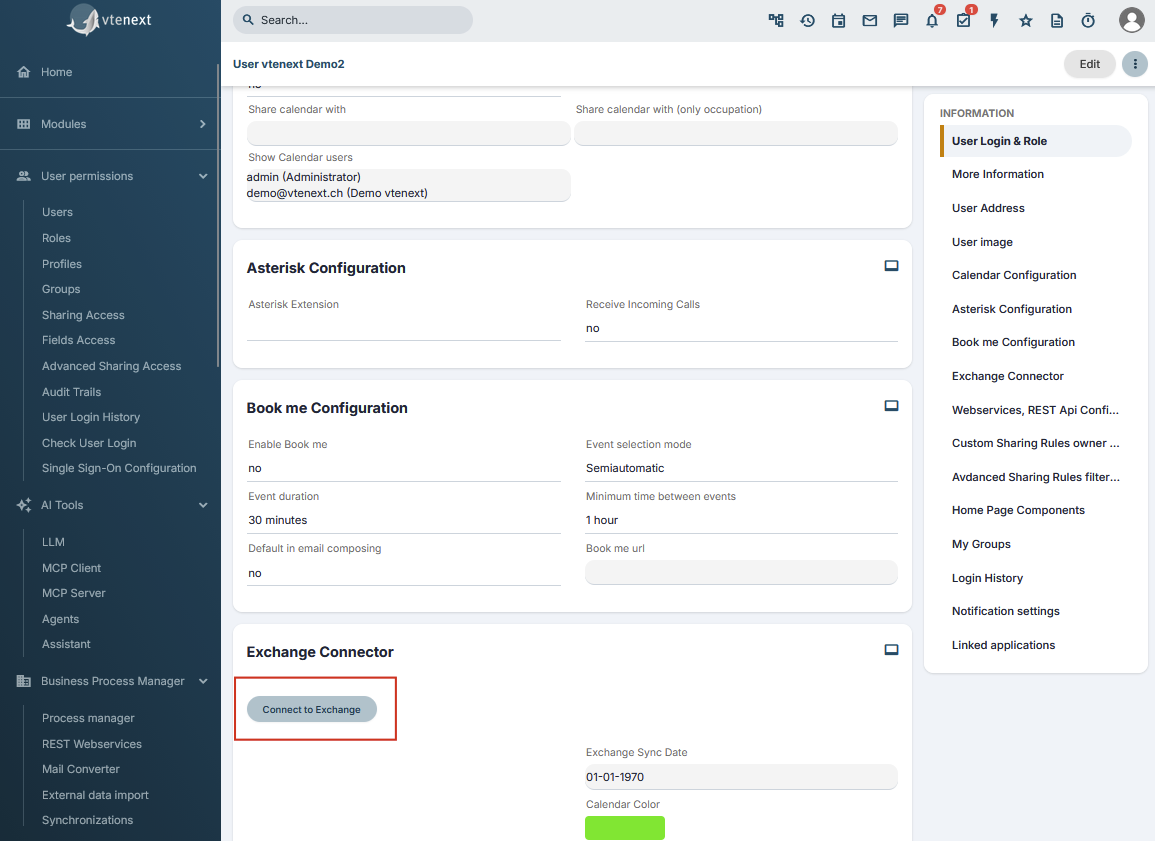
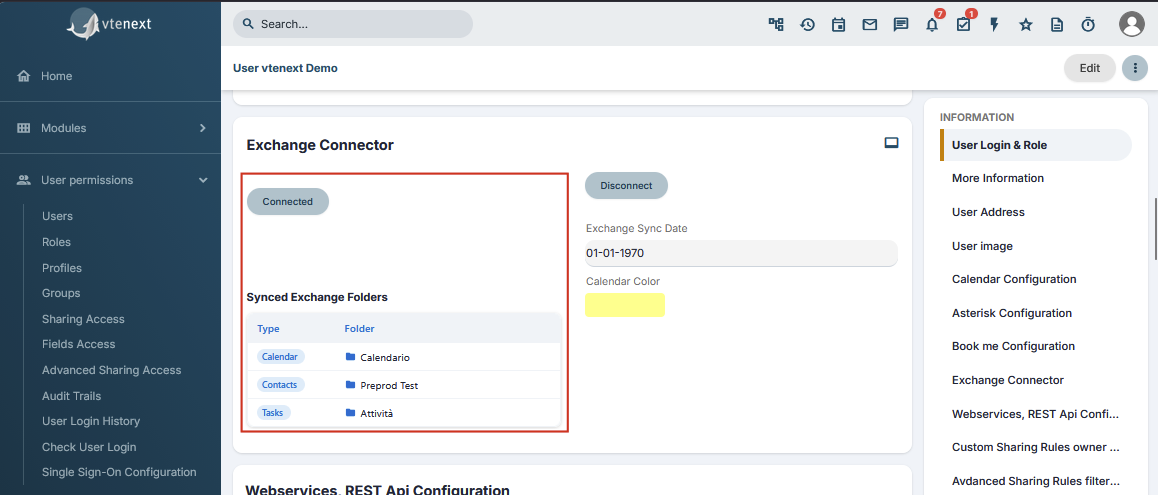
When the connection is complete and folders are configured, the profile shows Connected.
Which account to use
Unless impersonation is configured, the e-mail address in the vtenext user profile must match the Microsoft account being connected.
Do not use the same e-mail address for two different vtenext users. This can cause synchronization issues and problems when handling calendar invitations, especially with external users.
Warning when Microsoft access expires
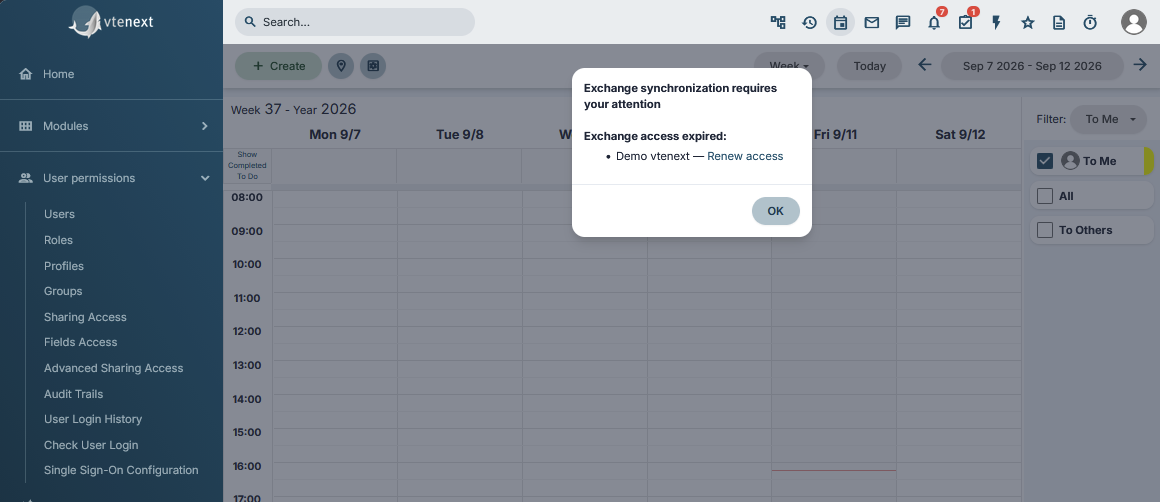
In the new Exchange Connector versions, vtenext checks Microsoft 365 authorization status. If one or more accounts are disconnected or their access has expired, a popup appears in the vtenext Calendar.
The warning lists accounts with Exchange access expired and provides a Renew access action. The user must renew the Microsoft authorization to restore normal synchronization.
- Identify the account shown as Exchange access expired.
- Click Renew access.
- Complete Microsoft sign-in and authorization again.
- Return to vtenext and verify that the warning disappears.
- Run a synchronization test if the account remained disconnected for a significant period.
If Connect or Renew access still fails
Verify that Microsoft sign-in completes all the way back to vtenext, that the vtenext session has not expired and that Office365 configuration is correct. See User Cannot Connect.
When to reconnect
Use Connect or Renew access when Microsoft authorization expires or is revoked, after an Exchange configuration reset, or when requested by support. If the Proxy/Custom App mode changes, follow Changing Exchange Type or Connection Method.
Configuring an Exchange Server User
With Exchange Server, the user is configured from their vtenext profile using Exchange credentials.
Required data
Check at least:
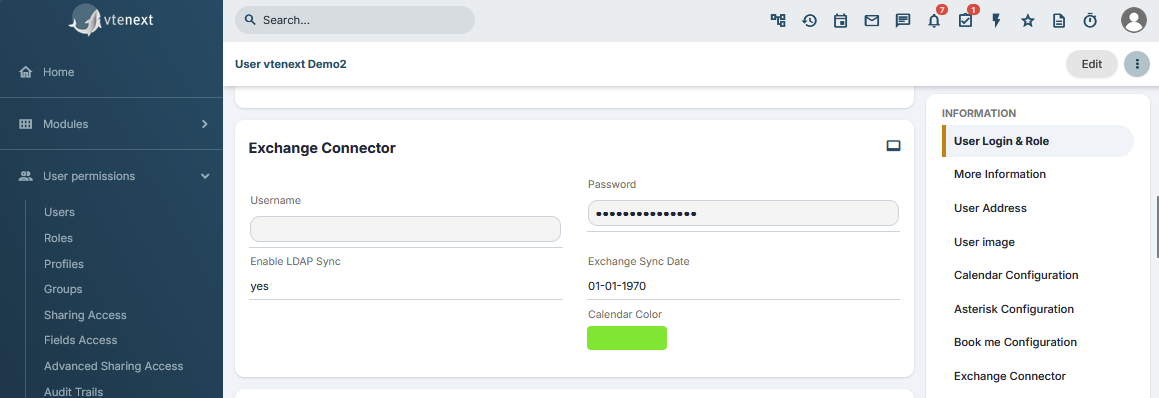
- Exchange Username;
- Exchange Password;
- optional Exchange Sync Date;
- Exchange folders;
- Is Resource or Impersonation when actually used.
Credential test
When user preferences are saved, the connector attempts to sign in to Exchange. If the credentials are valid, the profile is saved normally; if the credentials are incorrect or another connection problem exists, vtenext reports the issue and prevents the configuration from being saved.
If the test reports an invalid username or password, correct the credentials first. Do not continue changing folders or restarting synchronization until the Exchange login works.
Folder selection
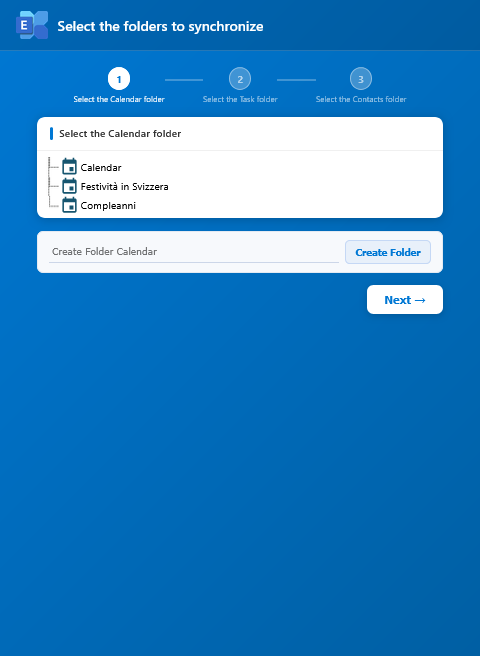
Once access has been validated, select the folders used for Calendar, Tasks and Contacts. The connector can show both default and custom mailbox folders.
After saving
- Create a test event in vtenext.
- Verify that it appears in the selected Exchange calendar.
- Modify it in Exchange.
- Verify that the change returns to vtenext.
Repeat the test for any other enabled modules.
Exchange password changes
If the user changes their Exchange password, update the password in the vtenext profile as well. Synchronization can stop until the password is updated.
Selecting or Changing Synchronization Folders
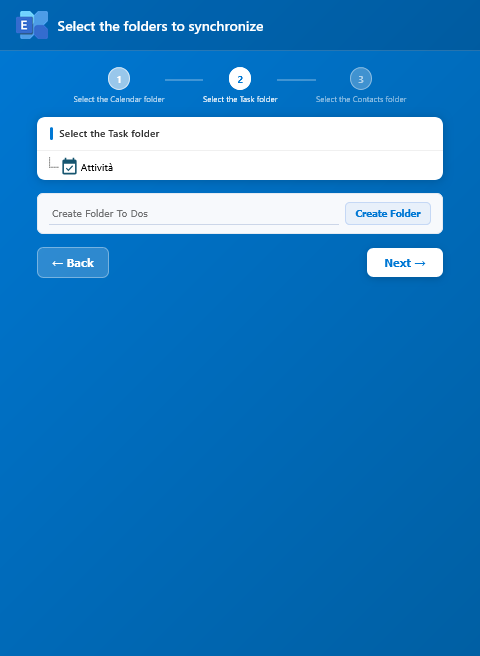
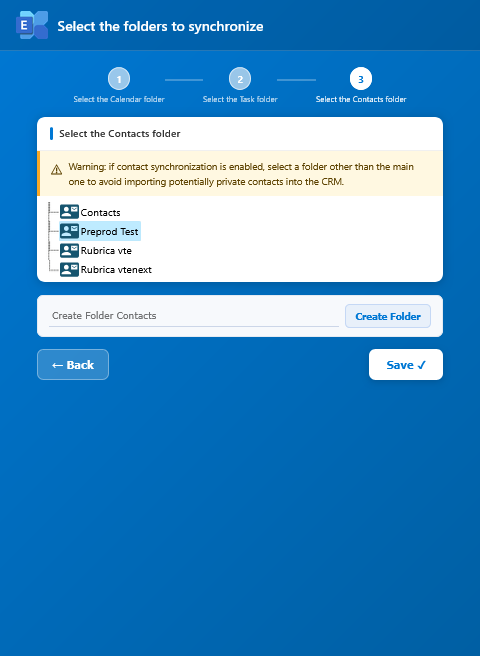
Each user uses a specific folder for each synchronized data type.
Normally, users select:
- a Calendar folder;
- a Tasks folder;
- a Contacts folder.
Microsoft 365
After connecting with Connect, vtenext shows the available folders in the Microsoft account.
For Tasks, available Microsoft To Do lists are shown. The Flagged Emails list is not used as a synchronization folder. For Contacts, the main Contacts folder is also available.
Exchange Server
With Exchange Server, vtenext can show both default folders and custom mailbox folders.
Which folder to choose
Use a dedicated, clearly named folder when vtenext data should be separated from the user's personal data. If the business process requires the default folder, select it knowingly because changes made there can be synchronized back to vtenext.
Synchronization folders can also be created directly from the folder selection interface.
Changing a folder that is already in use
Folders already used by an active user must not be changed directly. The change requires administrator involvement and must be planned in advance with your vtenext vendor or partner.
Once a folder has been used for synchronization, vtenext and Exchange have stored relationships between synchronized entities. Simply switching folders can therefore cause conflicts, duplicates or incorrect behavior for previously synchronized Contacts, Events, Tasks and other records.
The procedure must be planned and generally includes:
- identify the affected users and folders;
- agree on the intervention with the vtenext vendor or partner;
- stop or control synchronization during the intervention;
- remove the synchronization information for records previously synchronized with Exchange, according to the administrator procedure;
- select the new folders;
- restart synchronization in a controlled way;
- validate the result with test records before closing the activity.
On a production system, do not change folders or delete synchronization references without an agreed procedure. The operation must be assessed case by case to avoid lost associations, duplicates or conflicts between vtenext and Exchange.
Resource Users and Impersonation
The Is Resource and Impersonation options are intended for specific scenarios and should not be enabled for every user.
Is Resource
Use Is Resource when the vtenext profile represents an Exchange resource, such as a mailbox or calendar dedicated to a meeting room, equipment or another company resource.
For a normal person with their own mailbox, this option is generally not required.
Impersonation
Use Impersonation when the Exchange environment has been configured so that one account can operate on another user's or resource mailbox.
The required permissions must already exist in Microsoft/Exchange. Enabling the option in vtenext does not automatically grant them.
Before using these options
Confirm with the Microsoft/Exchange administrator:
- which mailbox must be synchronized;
- which account performs the connection;
- whether the required permissions are already configured;
- which folders must be used.
If no special setup exists, use the standard one-vtenext-user-to-one-Exchange-mailbox configuration.
5. Field Mapping
How to review and edit field mapping between vtenext and Exchange, and what happens after a change.
Viewing Field Mapping
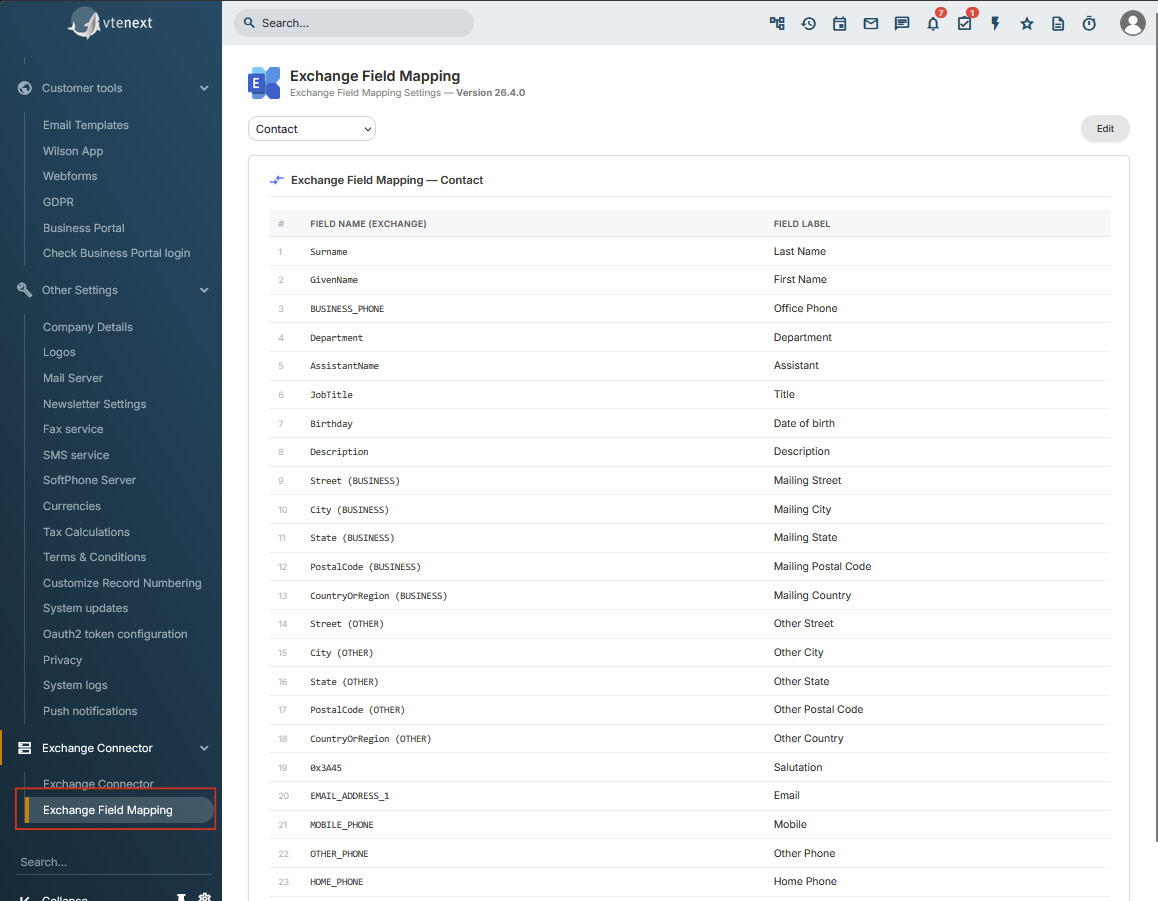
Field mapping defines which Exchange field corresponds to which vtenext field.
For example, the main Exchange e-mail field can be mapped to the vtenext Contact e-mail field, the business phone to the company phone field, and so on.
Where to find it
Open Settings > Exchange Field Mapping.
The page allows you to select a module and displays, for each row, the Exchange field and the associated vtenext field.
Available modules
Mappings are available for Contacts, Organizations, Calendar / Events and Tasks. In the normal 24.08 interface, custom editing is available for Contacts and Organizations; Calendar and Task mappings are visible but are not edited with the same button.
Locked fields
Some rows are mandatory or structural and are shown as locked. These fields cannot be changed from the mapping page.
Before making changes
- Take a screenshot of the current mapping.
- Check whether the module is already used by many users.
- Identify which fields are actually required.
- Read What Happens When a Mapping Is Changed.
A mapping change is not only a visual configuration change: it can trigger a new synchronization of existing records.
Editing a Mapping
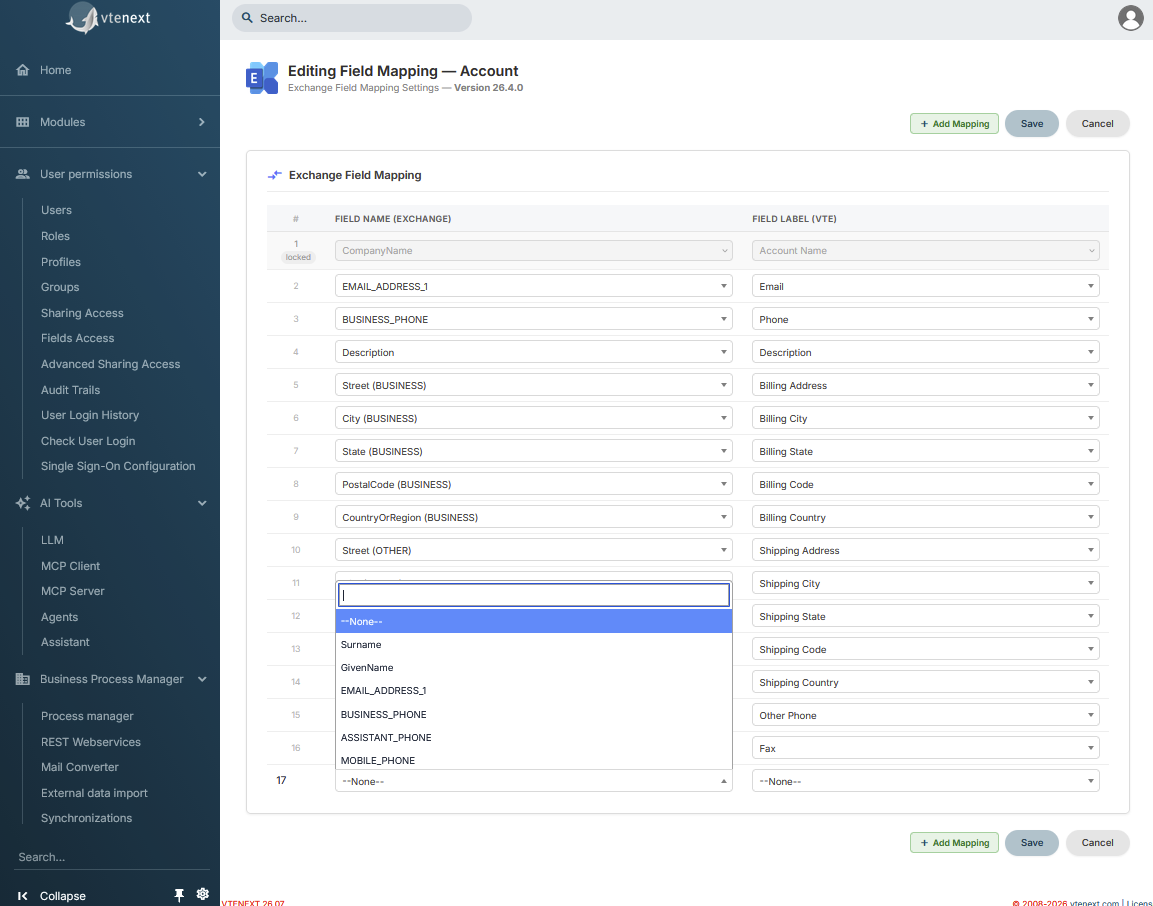
Custom mapping changes are available for Contacts and Organizations.
Save a screenshot of the current mapping and review What Happens When a Mapping Is Changed.
Procedure
- Open Settings > Exchange Field Mapping.
- Select Contacts or Organizations.
- Click Edit.
- For each row, select the corresponding Exchange and vtenext fields.
- Use Add mapping when another association is needed.
- Review all rows.
- Click Save and confirm the warning.
Mapping rules
Compatible field types
An Exchange field can only be associated with a compatible vtenext field type.
A field cannot be used twice
The same Exchange or vtenext field cannot be reused in two different mappings.
Main e-mail is mandatory
Contacts and Organizations must include a mapping for the Exchange Primary E-mail field (EMAIL_ADDRESS_1). Saving is blocked if this mapping is missing.
Locked fields
Rows shown as locked cannot be edited.
Using --None--
When a field pair should not be synchronized, it can be left on --None--.
Before clicking Save
Save does more than change the configuration: for Contacts and Organizations it can trigger a rebuild of Exchange synchronization. Read the next page before changing a production system.
What Happens When a Mapping Is Changed
Changing and saving the mapping for Contacts or Organizations has an important operational effect.
A mapping change must be treated as a synchronization rebuild, not as a simple configuration edit.
Effect of saving
When the module is active and a new mapping is saved, the connector does not apply it only to future records.
For enabled Exchange users, the connector can remove previously synchronized Contact or Organization copies from Exchange and publish them again from vtenext using the new mapping.
The original vtenext records are not deleted by the mapping change; the rebuild affects the synchronized Exchange copies.
What users may notice
- affected records may temporarily disappear from Exchange;
- they may then be recreated with the new mapped fields;
- resynchronization can take time when many records or users are involved;
- Exchange identifiers for recreated copies may change;
- concurrent manual edits can make it harder to determine which value is correct.
Recommended production procedure
Make the change in a controlled maintenance window, preferably after a test, and keep a screenshot of the previous mapping.
- Save a screenshot of the current mapping.
- Verify that no bulk imports or mass edits are running.
- Choose a low-activity period.
- Test the new mapping in a test environment if possible.
- Verify that the main e-mail field remains mapped correctly.
- Save the new configuration.
- Allow resynchronization to complete.
- Check sample records in vtenext and Exchange.
If only one field is changed
Even a small mapping change is saved as a new module configuration. Do not assume that only that single field will be updated on existing records.
If something is wrong after the change
Wait for resynchronization to complete and verify the saved configuration, user connections and a few sample records before making another change.
Recommended Mapping Examples
The initial configuration already includes useful field associations. Start from these defaults and customize only what is actually required by the business process.
Contact example
| Exchange | vtenext |
|---|---|
| Last name | Last name |
| First name | First name |
| Primary e-mail | |
| Business phone | Phone |
| Mobile phone | Mobile |
| Home phone | Home phone |
| Business fax | Fax |
| Department | Department |
| Job title | Title |
| Birthday | Date of birth |
| Business address | Primary shipping address |
| Other address | Other address |
The Primary e-mail field must remain mapped to a valid vtenext e-mail field.
Organization example
| Exchange | vtenext |
|---|---|
| Company name | Organization name |
| Primary e-mail | |
| Business phone | Phone |
| Description | Description |
| Business address | Billing address |
| Other address | Shipping address |
Organization name is a structural association and should not be treated like a normal free mapping row.
When to add a custom field
Add a mapping only when the value is actually used, the vtenext field type is compatible, the information must be visible in Exchange and it is clear which system is the authoritative source for the value.
Avoid excessive mappings
Synchronizing many unused fields makes troubleshooting harder. A smaller, clear mapping based on real business needs is usually preferable.
6. Daily Use of the Connector
How synchronization behaves during normal use and what to expect for events, tasks, contacts and organizations.
How Synchronization Works
After configuration, Exchange Connector works automatically in the background and can keep data synchronized in both directions.
Two-way synchronization
When a function is enabled, the connector can process changes from vtenext to Exchange and from Exchange to vtenext. Actual behavior depends on the enabled module, selected folder and configured mapping.
How inbound changes are received
The mechanism differs between Exchange Server/EWS and Microsoft 365/Graph. Network requirements and the difference between EWS streaming and Graph push notifications are described in Opening and Configuring Exchange Connector.
For provider-specific details, see Configuring Microsoft 365 or Configuring Exchange Server.
Synchronization is not always immediate
Changes are normally processed quickly, but a few minutes of delay can occur between the two systems. The connector also runs periodic checks to recover changes that were not processed on the first attempt.
If a change does not appear immediately, wait for the normal synchronization cycle before repeating the same operation.
First connection
After connecting a new user or after a migration, the first alignment can take longer. Duration depends on the number of records and users, recurring events and connection speed.
Avoid mass changes during initial alignment
During the first synchronization, avoid bulk imports, mapping changes, mass assignee changes and large Exchange folder moves. First verify that normal synchronization is stable.
How to test
- Create an easily identifiable test record in vtenext.
- Verify that it appears in Exchange.
- Modify it in Exchange.
- Verify that the change returns to vtenext.
This is more reliable than testing with an old record whose previous history is unknown.
Events, Recurrences and Online Meetings
Calendar synchronization keeps events aligned between vtenext and Exchange when Event synchronization is enabled.
Creating and editing events
An event created or edited in vtenext is sent to the user's Exchange calendar. Changes made in Exchange can also be synchronized back to vtenext.
For testing, use clearly identifiable events, for example TEST EXCHANGE - DO NOT USE.
Deletions
The connector manages deletions, but test this behavior first with a dedicated test event. Do not use a real appointment as the first deletion test.
Recurring events
The connector also handles recurring events. For series without an end date, vtenext progressively maintains the future occurrences required for synchronization.
After migration or a major configuration change, test at least a weekly series, a change to the series and, if used, a change to a single occurrence.
Microsoft 365 and Microsoft Teams meetings
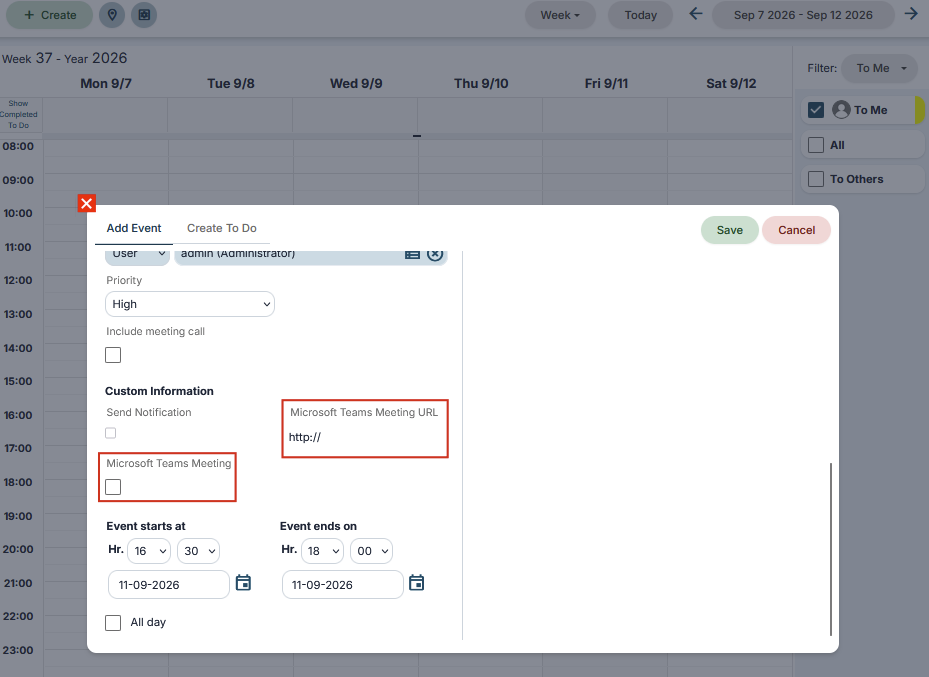
In the new Exchange Connector versions, when Microsoft 365 / Exchange Online is used, an event can be created and managed as a Microsoft Teams online meeting and the related Teams link can be used directly from the synchronized event.
This feature is available with Microsoft 365 through Microsoft Graph. It is not available with on-premises Exchange Server through EWS.
When Teams is used, verify that the event is created correctly, that the Teams link is generated and available where expected, and that editing the event does not remove the online meeting link.
If an event appears duplicated
Before deleting one of the events, check whether the user was recently reconnected, synchronization folders were changed, an EWS-to-Graph migration just took place, or bulk imports/changes were performed. Do not keep creating additional test events until the cause is understood.
Tasks, Contacts and Organizations
In addition to Calendar, Exchange Connector can synchronize Tasks, Contacts and Organizations when the corresponding options are enabled.
Tasks
Tasks are synchronized with the folder selected by the user. With Microsoft 365, this corresponds to a Microsoft To Do list. During testing, verify subject, due date, status and changes in both directions.
Contacts and Organizations
Transferred fields depend on the configured mapping. See Viewing Field Mapping and Recommended Mapping Examples.
If a field is not included in the mapping, it should not be assumed to synchronize automatically.
Assignee and synchronization user
For Contacts and Organizations, the administrator can select a specific user or use same as entity. If a record does not synchronize to the expected mailbox, check this setting and the record assignee.
After a mapping change
Saving a new mapping can affect records that have already been synchronized. Before making a production change, read What Happens When a Mapping Is Changed.
7. Common Issues and Checks
Checks to perform when a user cannot connect or data does not synchronize correctly.
User Cannot Connect
When a user cannot connect Exchange, first determine whether the issue affects Microsoft 365 or Exchange Server.
Microsoft 365
The normal connection procedure, Connected status and renewal of expired access are described in Connecting a Microsoft 365 User.
If Exchange synchronization requires your attention appears with Exchange access expired, use Renew access. Do not reconfigure the global connector as the first action.
If Connect or Renew access does not complete the connection, check the Microsoft account used, the vtenext session and the Office365 configuration. For Proxy/Custom App parameters, see Configuring Microsoft 365.
Exchange Server
If the Exchange Server user test fails, verify Exchange Username, Exchange Password, Mail Server, Exchange server reachability and any Resource/Impersonation permissions. See Configuring an Exchange Server User.
An HTTP 401 error normally means that the server did not accept the credentials.
After correcting the issue
- Save the configuration or user profile.
- Repeat the connection or credential test.
- Verify selected folders.
- Create one test record.
- Check synchronization in both directions.
Data Does Not Synchronize
If the user is connected but a record does not synchronize, first check the connector configuration and the record context.
Initial checks
- the relevant module is enabled;
- the user is connected correctly;
- the correct folder is selected;
- the record belongs to the expected user;
- for Contacts or Organizations, the mapping contains the field being checked;
- an initial synchronization or resynchronization is not still in progress.
The record exists but a field does not change
For Contacts and Organizations, check the mapping. If the field is not mapped, the connector cannot transfer its value. If the mapping was changed recently, wait for resynchronization to complete before changing the configuration again.
It works in one direction only
- Create or edit a record in vtenext and check Exchange.
- Edit the same record in Exchange and check vtenext.
If only one direction fails, record exactly which step fails. This helps distinguish an outbound issue from an inbound issue.
The problem affects only one user
Check the user's connection or credentials, selected folders, record assignee and any Resource/Impersonation configuration.
The problem affects all users
Check the global configuration and automatic connector processes first. Do not disconnect all users as the first troubleshooting step; if the problem is global, reauthorization will not fix the root cause.
Checking Automatic Processes
Exchange Connector uses automatic processes to keep synchronization active and manage recurring events.
Their status is available under Settings > Exchange Connector.
Main processes
- ExchangeControlCron: handles normal Exchange synchronization and checks;
- InfiniteRecurrencesCron: extends recurring events without an end date.
After a new installation, automatic processes may initially be disabled and should only be activated after connector configuration is complete.
What to check
For each process, verify that it is Active, that Last Run is updating, that the process does not remain stuck and that the attempt counter does not continue increasing.
If a process is disabled
After verifying that the connector is configured correctly, use Activate.
If the issue has been fixed but the process does not restart
After correcting the cause, use Reset Status, Reset Attempts and finally Run Now for an immediate check.
When to use Kill
Do not use Kill as a normal restart method and do not click it repeatedly.
If all users stop synchronizing
Check these processes before disconnecting or reconfiguring users. If the main process is not running, the issue is global and does not necessarily depend on individual user accounts.
Problems After a Mapping Change
This page contains only the checks to perform when the result after a mapping change is not what you expected. For the normal behavior of saving a mapping, first read What Happens When a Mapping Is Changed.
Records disappeared from Exchange
If the mapping was just saved, wait for resynchronization to complete before intervening. Original vtenext records are not deleted by the mapping change.
Records return but some fields are empty
Check that the field is mapped, the field type is compatible, the value exists in vtenext and the primary e-mail is still mapped correctly. For mapping rules, see Editing a Mapping.
Duplicates are created
Do not keep changing the mapping until the cause has been identified.
Check whether the previous resynchronization had finished, folders were also changed, users were reconnected at the same time, or bulk imports were performed.
Returning to the previous mapping
Use the screenshot or documentation saved before the change. Saving the old mapping again also starts another resynchronization; it is not an instant undo.
License or Connector Components Unavailable
If the Exchange Connector page requests a license or displays a message that prevents normal use of the module, identify the type of warning before changing users or mappings.
License not active
- Enter the license key provided for the connector.
- Click Verify.
- Wait for activation confirmation.
- Reload the Exchange Connector page.
Check that it was copied completely and without extra spaces. If the problem continues, contact the license provider.
Error while installing components
After installation or upgrade, a message may indicate that one or more components required by Exchange Connector were not installed correctly.
Use the Retry action if available. If the retry fails again, the issue must be checked on the vtenext server. Common causes include:
- the server cannot reach the required Internet services;
- a firewall or proxy blocks downloads;
- required PHP extensions are unavailable;
- the server does not have the required write permissions.
These checks must be performed by the server administrator.
What not to do
Avoid disconnecting all users, repeatedly changing the Exchange type, changing mappings or starting mass resynchronizations. Restore normal connector operation first.
Information to Collect Before Contacting Support
Before opening a support request, collect precise information so the issue can be identified more quickly.
Information to provide
- Exchange Connector version;
- configured Exchange type: Office365, Exchange 2016, Exchange 2019 or Exchange SE;
- whether Office365 uses vtenext Proxy or a Custom Microsoft App;
- name of the affected user;
- affected module: Events, Tasks, Contacts or Organizations;
- direction that does not work: vtenext → Exchange or Exchange → vtenext;
- approximate date and time of the test;
- ID or name of the test record;
- selected Exchange folder;
- any recent changes to provider, account, folders or mapping.
Useful screenshots
When possible, include:
- the user's connection status;
- the Exchange Connector page showing automatic process status;
- the mapping for the affected module;
- the complete error message;
- the test record in vtenext and the corresponding Exchange item.
Do not include passwords, Client Secrets or other credentials in screenshots.
Describe a reproducible test
A useful report is specific, for example:
User John Smith, Office365 Proxy. At 10:15 I created the event “TEST EXCHANGE 123” in vtenext. After the normal synchronization cycle, the event does not appear in the selected Exchange calendar. Changes from Exchange to vtenext do work.
This is much more useful than a generic report such as “Exchange does not work”.